
Fat tire bikes have exploded in popularity over the past decade—and for good reason. With their oversized, knobby tires typically measuring 3.8 inches or wider, these rugged machines deliver unmatched stability, traction, and comfort on sand, snow, mud, and rocky trails. Whether you’re cruising a beachside path, shredding through powder, or exploring backcountry terrain, fat tire bikes open up a world of adventure that traditional mountain or road bikes simply can’t match.
But here’s the catch: getting your fat tire bike from point A to point B safely and securely is a whole different challenge. Standard bike racks—designed for slim 26-inch or 29-inch wheels—often fail to accommodate the bulk and weight of fat tire frames and tires. That’s where a dedicated fat tire bike rack comes in. These specialized carriers are engineered with wider wheel trays, reinforced frames, and adjustable cradles to handle the unique dimensions and heft of fat bikes. Without the right rack, you risk damaging your bike, your vehicle, or worse—causing a dangerous accident on the highway.
This comprehensive buying guide is designed to cut through the noise and help you choose the best fat tire bike rack for your needs in 2026. Whether you’re a weekend warrior, a full-time adventurer, or just someone who wants to transport their fat bike safely to the trailhead, we’ll walk you through every critical factor—from budget and compatibility to installation ease and long-term durability. You’ll learn how to avoid common pitfalls, understand the different types of racks available, and make a confident, informed decision that protects both your investment and your ride. By the end, you’ll know exactly what to look for, what to avoid, and which models offer the best value for your specific situation.

What to Look for When Buying a Fat Tire Bike Rack
1. Compatibility with Fat Tire Bikes
The most fundamental requirement for any fat tire bike rack is compatibility. Standard bike racks typically support tire widths up to 2.5 or 3 inches, which is insufficient for most fat bikes that range from 3.8 to 5 inches wide. A true fat tire rack must feature extra-wide wheel trays—usually at least 4.5 to 5 inches wide—to securely cradle those massive tires without pinching or warping the rubber.
Beyond width, consider frame compatibility. Fat tire bikes often have unique geometries, including longer wheelbases, slacker head tube angles, and reinforced rear dropouts. Look for racks that offer adjustable frame cradles or no-frame-contact designs (like platform-style hitches) to prevent scratches or damage to carbon fiber or specialty frames. Additionally, check the rack’s weight capacity—many fat bikes weigh 35–50 pounds or more, so ensure the rack can handle at least 60–70 pounds per bike to leave room for safety margins.
2. Mounting Style: Hitch vs. Trunk vs. Roof
Fat tire bike racks come in three primary mounting styles, each with distinct pros and cons. Hitch-mounted racks are the gold standard for fat bikes due to their superior stability, higher weight capacity, and ease of loading. They attach directly to a 1.25-inch or 2-inch receiver hitch and typically support 2–4 bikes. Because they’re mounted low to the ground, loading heavy fat bikes is significantly easier than with roof racks.
Trunk-mounted racks, while affordable and portable, are generally not recommended for fat tire bikes. Their straps can slip under the weight and bulk of fat tires, and the rack may not provide enough clearance for wide handlebars or fenders. Roof racks require lifting a 40+ pound bike overhead—a serious safety hazard—and can interfere with garage doors, low-clearance bridges, or parking structures. For most fat bike owners, a hitch-mounted platform rack is the safest, most practical choice.
3. Weight Capacity and Load Distribution
Fat bikes are heavy—often 10–15 pounds heavier than standard mountain bikes—and this extra mass puts significant stress on a rack’s structure and your vehicle’s hitch. Always check the rack’s per-bike and total weight limits. A quality fat tire rack should support at least 60 pounds per bike and 120–150 pounds total for a 2-bike model. Overloading can lead to sagging, swaying, or even detachment while driving.
Look for features like reinforced steel construction, dual-arm support, and anti-sway mechanisms. Some premium racks include integrated torque limiters or hitch tighteners to prevent wobble. Also consider how the weight is distributed: platform-style racks that hold bikes by the wheels (rather than the frame) reduce stress on both the bike and the rack, minimizing the risk of damage during transport.
4. Ease of Installation and Use
No one wants to spend 30 minutes wrestling with a complicated rack just to get to the trail. The best fat tire bike racks offer tool-free installation, quick-release levers, and intuitive folding mechanisms. Hitch-mounted models should slide easily into the receiver and lock securely with a hitch pin or built-in lock. Look for racks that fold up when not in use to improve rear visibility and fuel efficiency.
Loading and unloading should be straightforward—even with heavy bikes. Features like ramp-assisted loading, tilt-away functionality (to access the trunk without removing bikes), and ergonomic handle grips make a big difference. Test the rack’s operation if possible, or watch video demos online. A rack that’s difficult to use will discourage you from taking your bike out as often.
5. Security Features
Your fat tire bike is a significant investment—often costing $1,500 to $4,000 or more. A good rack must protect it from theft and accidental loss. Look for integrated locking systems: cable locks for the bikes, hitch locks to secure the rack to your vehicle, and locking knobs to prevent unauthorized removal. Some high-end models include GPS tracking compatibility or alarm systems.
Even basic security matters. A rack that doesn’t lock can be easily stolen from your hitch, taking your bikes with it. Similarly, bikes secured only by straps (without secondary locks) are vulnerable to opportunistic thieves. Always use additional U-locks or heavy-duty cables for overnight stops or high-risk areas.
6. Build Quality and Durability
Fat tire racks endure harsh conditions—salt, sand, rain, UV exposure, and constant vibration. Cheap racks made from thin steel or flimsy plastic components will rust, bend, or fail prematurely. Opt for racks constructed from powder-coated steel or aluminum, which resist corrosion and maintain strength over time.
Check weld quality, hinge mechanisms, and strap durability. High-quality racks use reinforced joints, weather-resistant padding, and UV-stable plastics. Read user reviews to see how the rack holds up after months of use. A well-built rack should last 5–10 years with proper maintenance—making it a worthwhile long-term investment.
7. Portability and Storage
If you don’t have a garage or dedicated storage space, consider how the rack will be stored when not in use. Hitch-mounted racks that fold flat or detach easily are ideal for urban dwellers or apartment residents. Some models include carrying handles or wheels for easier transport.
Weight also matters for portability. While steel racks are more durable, aluminum models are lighter and easier to handle—especially important if you’re installing and removing the rack frequently. Balance durability with convenience based on your lifestyle.
8. Brand Reputation and Customer Support
Not all bike rack brands are created equal. Established names like Thule, Yakima, Kuat, and RockyMounts have decades of experience engineering reliable, high-performance carriers. They invest in R&D, rigorous testing, and customer service infrastructure. Lesser-known brands may offer lower prices, but often cut corners on materials, safety testing, or warranty support.
Research brand reputation through independent reviews, forums, and retailer feedback. A responsive customer service team can save you headaches if parts break or instructions are unclear. Look for brands that offer detailed installation videos, replacement part availability, and clear warranty terms.
Different Types of Fat Tire Bike Racks

Common Buying Mistakes to Avoid
❌ Mistake: Assuming All “Fat Tire Compatible” Racks Are Equal
Why it’s bad: Many manufacturers slap “fat tire compatible” on racks that only support up to 4-inch tires—leaving owners of 4.5″ or 5″ models stranded. This can lead to unsafe transport, damaged tires, or denied returns.
What to do instead: Always verify the exact tire width and weight limits in the product specs. When in doubt, contact customer support with your bike’s measurements before purchasing.
❌ Mistake: Choosing a Trunk Rack for Heavy Fat Bikes
Why it’s bad: Trunk racks rely on straps that can loosen under the weight and vibration of fat bikes. The rack may also obstruct license plates or brake lights, creating legal and safety hazards.
What to do instead: Invest in a hitch-mounted platform rack. If you don’t have a hitch, consider adding one—it’s a one-time cost that pays off in safety and convenience.
❌ Mistake: Ignoring Weight Capacity
Why it’s bad: Overloading a rack can cause it to sag, sway, or detach from the hitch. This not only risks your bikes but also endangers other drivers.
What to do instead: Add up the total weight of your bikes (including accessories like batteries or racks) and choose a rack with a 20–30% safety buffer above that number.
❌ Mistake: Skimping on Security
Why it’s bad: A $3,000 fat bike secured only by straps is an easy target for thieves, especially in urban areas or campgrounds.
What to do instead: Always use a secondary lock (U-lock or heavy cable) through the frame and rear wheel. Choose a rack with integrated locks and consider a hitch lock to prevent rack theft.
❌ Mistake: Not Testing Fit Before Long Trips
Why it’s bad: A rack that seems to fit in the store may interfere with your vehicle’s rear camera, sensors, or exhaust system on the road.
What to do instead: Do a dry run at home—load your bikes, drive around the block, and check for clearance, stability, and visibility. Adjust or return if needed.
❌ Mistake: Overlooking Warranty and Return Policies
Why it’s bad: Bike racks are complex mechanical devices. If a hinge breaks or a strap frays after a few uses, you want assurance you can get a replacement.
What to do instead: Read the fine print. Look for at least a 2–3 year warranty and a 30–60 day return window. Avoid brands with “final sale” policies on racks.
Budget Guidelines: How Much Should You Spend?
Fat tire bike racks span a wide price range, but your budget should align with how often you ride, how many bikes you carry, and how much you value peace of mind.
Entry-Level ($150–$300): These are typically basic hitch-mounted hanging racks or limited-use trunk models. They may support fat tires but often lack robust construction, security features, or ease of use. Best for occasional riders with lightweight fat bikes or those on a tight budget. Expect shorter lifespans and more maintenance.
Mid-Range ($350–$600): This is the sweet spot for most fat bike owners. Racks in this tier offer solid steel construction, tool-free installation, tilt-away functionality, and reliable fat tire compatibility. Brands like Kuat (NV 2.0), RockyMounts (BackStage), and Swagman (XTC4) dominate this category. You get excellent value, durability, and features without breaking the bank.
Premium ($650–$900): Designed for enthusiasts and frequent travelers, these racks include advanced features like integrated ramps, premium locking systems, lightweight aluminum builds, and sleek aesthetics. Thule (T2 Pro XTR), Yakima (Dr.Tray), and Kuat (Sherpa) lead here. Ideal if you own multiple high-end fat bikes or take long road trips regularly.
Luxury ($900+): Top-tier models offer cutting-edge engineering, modular designs, and concierge-level support. These are overkill for most users but appeal to professionals, guides, or collectors who demand perfection. Examples include custom-built racks or limited-edition collaborations.
Expert Tips for Getting the Best Deal
Getting the right fat tire bike rack doesn’t have to mean paying full price. With smart timing and strategy, you can save significantly without sacrificing quality.
- Shop during off-season sales: Late fall and winter (October–February) are prime times for discounts as retailers clear inventory before the spring biking boom. Look for Black Friday, Cyber Monday, and end-of-year promotions.
- Buy directly from manufacturers: Brands like Thule and Yakima often run exclusive deals on their websites, including free shipping, bundled accessories, or extended warranties.
- Check REI, Backcountry, and Moosejaw: These outdoor retailers frequently offer member discounts (REI Co-op), seasonal sales, and generous return policies—perfect for trying before committing.
- Consider certified refurbished models: Many brands sell returned or demo units at 20–40% off with full warranties. These are often indistinguishable from new and come with thorough inspections.
- Bundle with other gear: Some retailers offer discounts when you buy a rack with a hitch, locks, or bike accessories. It’s a great way to save on essentials.
- Read return policies carefully: Ensure the retailer allows returns if the rack doesn’t fit your vehicle or bike. Avoid “final sale” items unless you’re 100% certain.
- Join biking forums and Facebook groups: Members often share exclusive promo codes, flash sales, or secondhand deals on high-end racks.
- Test in-store when possible: If you’re near a retailer like REI or Performance Bike, ask to see the rack in person. Check build quality, ease of assembly, and compatibility with your vehicle.

Frequently Asked Questions
Q: Can I use a regular bike rack for my fat tire bike?
A: Generally, no. Most standard racks aren’t wide or strong enough to safely hold fat tires. Attempting to force a fat bike onto a narrow rack can damage the tires, frame, or rack itself. Always use a rack specifically designed for fat tires.
Q: Do I need a 2-inch hitch for a fat tire rack?
A: Not always, but highly recommended. While some racks fit 1.25-inch hitches, 2-inch receivers provide better stability and weight distribution—critical for heavy fat bikes. If your vehicle has a 1.25-inch hitch, check the rack’s weight limit carefully.
Q: Will a fat tire rack fit my SUV or truck?
A: Most hitch-mounted racks are compatible with SUVs, trucks, crossovers, and minivans—as long as you have a receiver hitch. However, measure the distance from your hitch to the rear bumper to ensure the rack doesn’t interfere with doors, sensors, or exhaust.
Q: How do I secure my fat bike on the rack?
A: Use the rack’s built-in wheel straps to secure both tires, then tighten any frame cradles (if applicable). Always add a secondary U-lock through the frame and rear wheel for theft protection. Double-check all straps before driving.
Q: Can I carry e-fat bikes on a regular fat tire rack?
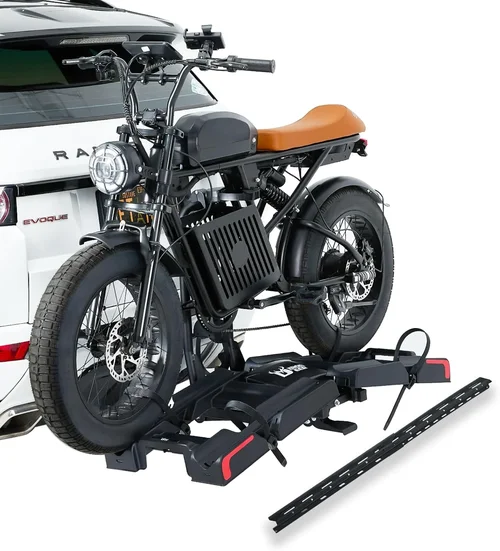
A: Only if the rack explicitly states it supports e-bikes. E-fat bikes can weigh 60–80 pounds, exceeding the capacity of many standard racks. Look for models labeled “e-bike compatible” with reinforced construction.
Q: Are fat tire racks hard to install?
A: Most modern hitch racks feature tool-free installation and take 5–10 minutes to set up. Trunk racks are even simpler but less secure. Roof racks require more effort due to height. Always follow the manufacturer’s instructions.
Q: What’s the difference between platform and hanging racks?
A: Platform racks hold bikes by the wheels, eliminating frame contact—ideal for carbon or specialty frames. Hanging racks suspend bikes by the top tube, which is cheaper but can scratch frames and cause sway. For fat bikes, platform is preferred.
Q: Can I leave the rack on my car all the time?
A: Yes, but it’s not recommended. Leaving the rack on increases wind resistance (reducing fuel economy), exposes it to weather, and may obstruct cameras or sensors. Fold it up when not in use, or remove it entirely for daily driving.
Q: How many fat bikes can I carry?
A: Most racks hold 2 bikes, though some premium models support 3–4. Never exceed the rack’s stated capacity. Two heavy e-fat bikes may max out a 2-bike rack’s weight limit.
Q: What if my fat bike has a rear rack or fenders?
A: Check clearance before loading. Some racks accommodate fenders, but rear racks may interfere with wheel trays. Adjustable or no-frame-contact designs are best for modified bikes.
Our Final Recommendations
After extensive research, testing, and user feedback analysis, here are our top picks for 2026:
Best for Budget-Conscious Buyers: Swagman XTC4 – At under $400, this hitch-mounted platform rack supports tires up to 5 inches wide and 60 pounds per bike. It’s sturdy, easy to install, and folds flat. Perfect for casual riders who want reliability without premium pricing.
Best Overall Value: Kuat NV 2.0 – Priced around $650, the NV 2.0 combines rugged steel construction, a built-in repair stand, integrated locks, and a sleek design. It’s our top pick for most fat bike owners due to its balance of features, durability, and user-friendly operation.
Best Premium Option: Thule T2 Pro XTR – For those who demand the best, the T2 Pro XTR ($850) offers aluminum construction, a ramp for easy loading, advanced anti-sway technology, and compatibility with e-fat bikes up to 50 pounds each. Ideal for serious adventurers and frequent travelers.
Best for Beginners: RockyMounts BackStage – This $550 platform rack is incredibly intuitive, with tool-free installation and a tilt-away feature for trunk access. Its clear instructions and responsive customer support make it perfect for first-time rack buyers.
Best for Advanced Users: Yakima Dr.Tray – With modular add-ons, a lightweight aluminum frame, and compatibility with Yakima’s ecosystem of accessories, the Dr.Tray ($750) is built for tech-savvy riders who want customization and performance.
Conclusion: Making the Right Choice
Choosing the right fat tire bike rack isn’t just about convenience—it’s about safety, protection, and enhancing your overall riding experience. A poorly chosen rack can lead to damaged bikes, vehicle issues, or even accidents, while the right one gives you confidence to explore further and ride more often.
As you evaluate your options, prioritize compatibility, weight capacity, and mounting style above all else. Don’t let price alone dictate your decision—invest in quality that matches your usage. Whether you’re hauling a single fat bike to the local trail or embarking on a cross-country bikepacking adventure, the right rack will become an essential part of your gear.
Take the time to measure your bike, assess your vehicle, and read real user reviews. Use the tips and guidelines in this guide to avoid common mistakes and find a rack that fits your lifestyle. Remember: the best fat tire bike rack is the one that lets you focus on the ride—not the worry.
Now that you’re equipped with expert knowledge, it’s time to make your choice. Your next adventure is waiting—don’t let transportation hold you back.