
Finding the charging port on a Gotrax scooter is simple once you know where to look. This guide breaks down the exact location for every major Gotrax model, offers charging best practices, and helps you avoid common mistakes. Whether you’re a new rider or upgrading your scooter, knowing where to plug in keeps you moving safely and efficiently.
Key Takeaways
- Charging port location varies by model: Most Gotrax scooters have the charging port on the rear fender near the rear wheel, but some newer models place it under the deck or near the handlebars.
- Look for a rubber cover: The charging port is protected by a small rubber flap to prevent dust and water from entering—always close it after charging.
- Use only the official Gotrax charger: Using third-party chargers can damage the battery or void your warranty.
- Charge in a dry, cool place: Avoid charging in direct sunlight, rain, or extreme temperatures to protect battery life.
- Full charge takes 4–6 hours: Most Gotrax scooters take about 4 to 6 hours to fully charge from empty, depending on the battery size.
- Check the LED indicator: A red light means charging; green means fully charged—don’t unplug too early.
- Regular maintenance extends battery life: Clean the port, avoid overcharging, and store the scooter properly when not in use.
📑 Table of Contents
- Where Is the Charging Port on a Gotrax Scooter? A Complete Guide
- Why the Charging Port Location Matters
- Charging Port Locations by Gotrax Model
- How to Charge Your Gotrax Scooter Properly
- Common Charging Mistakes to Avoid
- Troubleshooting Charging Issues
- Maintaining Your Gotrax Scooter’s Charging System
- Conclusion
Where Is the Charging Port on a Gotrax Scooter? A Complete Guide
So, you just got your brand-new Gotrax scooter—or maybe you’ve had it for a while but still aren’t 100% sure where to plug it in. Don’t worry, you’re not alone. One of the most common questions new and even experienced Gotrax riders ask is: “Where is the charging port on a Gotrax scooter?” It’s a simple question, but the answer isn’t always obvious—especially if you’re new to electric scooters or switching from a different brand.
Gotrax is one of the most popular names in affordable electric scooters, known for their reliability, sleek designs, and user-friendly features. Whether you ride a Gotrax GXL, G4, G2, or one of their newer models like the XR or Elite, knowing how and where to charge your scooter is essential. After all, a dead battery means no ride—and no fun.
In this guide, we’ll walk you through exactly where to find the charging port on every major Gotrax scooter model. We’ll also cover charging best practices, common mistakes to avoid, and tips to keep your battery healthy for years. By the end, you’ll be a charging pro—no more guessing, no more frustration.
Why the Charging Port Location Matters
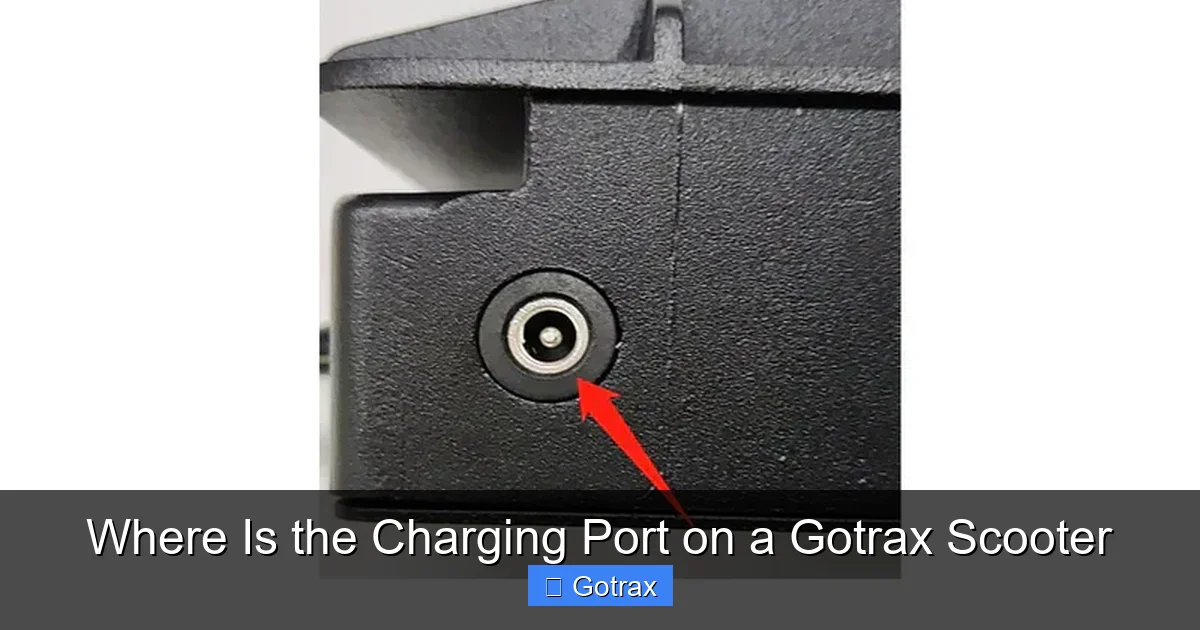
Visual guide about Where Is the Charging Port on a Gotrax Scooter
Image source: gotrax.ca
You might think, “It’s just a plug—how hard can it be?” But the location of the charging port actually plays a big role in your scooter’s usability, safety, and longevity. Gotrax designs its scooters with practicality in mind, so the charging port is usually placed where it’s easy to access but protected from the elements.
For example, placing the port near the rear wheel keeps it away from the handlebars and deck, reducing the risk of accidental bumps or water exposure during rides. At the same time, it’s still within reach when the scooter is folded or standing upright. Some models even tuck the port under the deck for a cleaner look, though this can make it slightly harder to reach.
Understanding where your charging port is—and how to use it properly—helps prevent damage, extends battery life, and ensures you’re always ready to ride. Plus, knowing the basics of charging can save you from frustrating situations like a dead scooter when you’re about to head out.
Safety First: What to Know Before Charging
Before we dive into the exact locations, let’s talk safety. Charging an electric scooter isn’t like plugging in your phone—there are a few important rules to follow to avoid accidents or damage.
First, always use the charger that came with your Gotrax scooter. Gotrax designs its chargers to match the voltage and current requirements of each model. Using a third-party charger—even if it fits—can overload the battery, cause overheating, or even start a fire.
Second, charge your scooter in a dry, well-ventilated area. Avoid charging outdoors in the rain or in direct sunlight. High temperatures can degrade the battery, while moisture can damage the port or internal components.
Finally, never leave your scooter charging unattended for long periods. While most Gotrax scooters have built-in protection to prevent overcharging, it’s still best to unplug once the battery is full. Overcharging can reduce battery lifespan over time.
Charging Port Locations by Gotrax Model

Visual guide about Where Is the Charging Port on a Gotrax Scooter
Image source: scooterinsights.com
Now, let’s get to the heart of the matter: where exactly is the charging port on your Gotrax scooter? The location varies slightly depending on the model, but there are some consistent patterns. Below, we’ll break it down by popular Gotrax scooters so you can find yours in seconds.
Gotrax GXL and GXL V2
The Gotrax GXL and GXL V2 are two of the brand’s most popular entry-level scooters. If you own one of these, here’s where to look:
The charging port is located on the rear fender, just above the rear wheel. It’s protected by a small rubber flap that you can lift up to reveal the port. The flap is designed to keep dirt, dust, and water out—so always make sure it’s closed after charging.
To access it, stand behind the scooter and look for a small, rectangular cover near the top of the rear fender. It’s usually centered and easy to spot once you know where to look. The port itself accepts a standard DC barrel connector, which is included with the charger.
Pro tip: If the rubber flap feels stiff or won’t close properly, gently clean it with a dry cloth. Dirt or debris can prevent a tight seal, which could lead to moisture damage over time.
Gotrax G2 and G4
The Gotrax G2 and G4 are slightly more compact than the GXL, but they follow a similar design. The charging port on these models is also located on the rear fender, just above the rear wheel.
Like the GXL, it’s covered by a rubber flap that you lift to plug in the charger. The port is centered and easy to access, even when the scooter is folded. This makes it convenient for charging at home, at work, or in a storage closet.
One thing to note: the G2 and G4 have slightly smaller batteries than the GXL, so they charge a bit faster—usually in about 4 to 5 hours. But the port location and charging process are nearly identical.
Gotrax XR and XR Elite
The Gotrax XR and XR Elite are part of the brand’s mid-range lineup, offering longer range and better performance. These models have a slightly different design, and the charging port reflects that.
On the XR and XR Elite, the charging port is located under the deck plate, near the rear of the scooter. You’ll need to lift the deck slightly or crouch down to see it. It’s still protected by a rubber cover, but it’s less visible than on the GXL or G2.
This placement keeps the port out of sight and reduces the chance of accidental damage. However, it can be a little harder to reach, especially if the scooter is on the ground. Some riders find it easier to charge when the scooter is propped up or placed on a low table.
Despite the different location, the charging process is the same: plug in the official Gotrax charger, wait for the LED to turn green, and unplug when done.
Gotrax G Max and G Pro
The Gotrax G Max and G Pro are high-performance models designed for longer commutes and rougher terrain. These scooters have larger batteries and more powerful motors, so they take a bit longer to charge—usually 5 to 6 hours.
The charging port on the G Max and G Pro is located on the rear fender, similar to the GXL and G2. It’s centered above the rear wheel and covered by a rubber flap. The port is slightly larger to accommodate the higher charging current, but it uses the same DC connector as other models.
One advantage of this placement is that it’s easy to access even when the scooter is folded. You don’t need to lift the deck or crouch down—just stand behind the scooter and lift the flap.
Gotrax Kids Scooters (e.g., Gotrax K1)
Gotrax also makes electric scooters for kids, like the Gotrax K1. These models are smaller and lighter, but the charging port location is consistent with the adult versions.
On the Gotrax K1, the charging port is on the rear fender, just above the rear wheel. It’s protected by a rubber flap and uses the same type of charger as the adult models. The main difference is the battery size—kids’ scooters have smaller batteries, so they charge faster, usually in 3 to 4 hours.
Parents should supervise charging, especially with younger riders. Make sure the scooter is turned off and the port is dry before plugging in.
How to Charge Your Gotrax Scooter Properly
Now that you know where the charging port is, let’s talk about how to charge your Gotrax scooter the right way. Proper charging not only keeps your scooter running smoothly but also extends the life of the battery.
Step-by-Step Charging Guide
Follow these simple steps to charge your Gotrax scooter safely and effectively:
1. **Turn off the scooter.** Always power down your scooter before plugging in the charger. This prevents any electrical surges or damage to the battery management system.
2. **Locate the charging port.** Use the model-specific guide above to find the port on your scooter. Lift the rubber flap to reveal the port.
3. **Plug in the charger.** Insert the DC connector from the official Gotrax charger into the port. Make sure it’s fully seated—don’t force it, but ensure it’s snug.
4. **Plug the charger into a wall outlet.** Use a standard 120V outlet. Avoid using extension cords or power strips if possible, as they can reduce charging efficiency.
5. **Check the LED indicator.** Most Gotrax chargers have an LED light. A red light means the scooter is charging; a green light means it’s fully charged.
6. **Wait for a full charge.** Depending on the model, this takes 4 to 6 hours. Don’t unplug too early—partial charges can reduce battery performance over time.
7. **Unplug and close the flap.** Once charged, unplug the charger and close the rubber flap to protect the port.
Charging Tips for Maximum Battery Life
To get the most out of your Gotrax scooter’s battery, follow these best practices:
– **Avoid deep discharges.** Try not to let the battery drop below 20% before charging. Frequent deep discharges can shorten battery life.
– **Charge after every ride.** Even if you only used 10% of the battery, plug it in. Lithium-ion batteries (like the ones in Gotrax scooters) prefer partial charges.
– **Store at 50–70% charge.** If you’re not using your scooter for a week or more, charge it to about 60% before storing. This helps preserve battery health.
– **Keep it cool.** Don’t charge in hot garages or direct sunlight. Ideal charging temperature is between 50°F and 86°F (10°C to 30°C).
– **Clean the port regularly.** Use a dry cloth to wipe away dust or debris from the charging port and rubber flap.
Common Charging Mistakes to Avoid
Even experienced riders make mistakes when charging their scooters. Here are some common pitfalls and how to avoid them:
Using the Wrong Charger
This is the #1 mistake. Never use a charger from another brand or model—even if it fits. Gotrax chargers are specifically designed for each scooter’s voltage and current. Using the wrong one can damage the battery or cause a fire.
Overcharging the Battery
While most Gotrax scooters have overcharge protection, leaving them plugged in for days can still stress the battery. Unplug once the light turns green.
Charging in Wet Conditions
Water and electricity don’t mix. Never charge your scooter in the rain, snow, or a damp garage. Moisture can seep into the port and cause corrosion or short circuits.
Ignoring the Rubber Flap
The rubber flap isn’t just for looks—it’s a vital seal. Always close it after charging to keep dirt and water out. A damaged or missing flap should be replaced immediately.
Charging on an Unstable Surface
Place your scooter on a flat, stable surface while charging. Avoid charging on beds, couches, or uneven floors where the scooter could tip over.
Troubleshooting Charging Issues
Sometimes, your Gotrax scooter won’t charge—even when everything seems right. Here’s how to troubleshoot common problems:
Charger Light Won’t Turn On
If the charger’s LED doesn’t light up, check the outlet first. Try plugging in another device to make sure the outlet is working. If it is, the charger or scooter may be faulty. Contact Gotrax support.
Battery Won’t Hold a Charge
If your scooter loses power quickly or won’t charge at all, the battery may be degraded. Lithium-ion batteries last 300–500 charge cycles. If your scooter is more than 2–3 years old, consider a battery replacement.
Port Feels Loose or Damaged
If the charging port wiggles or doesn’t hold the charger securely, it may be damaged. Stop using it immediately and contact Gotrax for repair or replacement.
Scooter Won’t Turn On After Charging
Make sure the battery is fully charged and the power button is pressed correctly. Some models require a long press to turn on. If it still won’t start, try a reset or contact support.
Maintaining Your Gotrax Scooter’s Charging System
Regular maintenance keeps your scooter in top shape. Here’s how to care for the charging system:
– **Inspect the port monthly.** Look for cracks, corrosion, or loose parts.
– **Clean the rubber flap.** Wipe it with a dry cloth to remove dirt.
– **Check the charger cable.** Look for fraying or exposed wires.
– **Store the charger properly.** Coil the cable neatly and keep it in a dry place.
Conclusion
Finding the charging port on a Gotrax scooter is easier than you think—once you know where to look. Whether you ride a GXL, G4, XR, or a kids’ model, the port is usually on the rear fender or under the deck, protected by a rubber flap. Knowing the exact location helps you charge quickly and safely.
More importantly, proper charging habits extend your scooter’s life and keep you riding longer. Use the official charger, charge in a dry place, and never ignore the rubber cover. With these tips, your Gotrax scooter will stay powered up and ready for every adventure.
So next time someone asks, “Where is the charging port on a Gotrax scooter?”—you’ll know exactly what to say. And better yet, you’ll know how to keep it working perfectly for years to come.
Frequently Asked Questions
Where is the charging port on a Gotrax GXL?
The charging port on the Gotrax GXL is located on the rear fender, just above the rear wheel. It’s protected by a small rubber flap that you lift to plug in the charger.
Can I use a different charger for my Gotrax scooter?
No, always use the official Gotrax charger that came with your scooter. Using a third-party charger can damage the battery or void your warranty.
How long does it take to charge a Gotrax scooter?
Most Gotrax scooters take 4 to 6 hours to fully charge, depending on the model and battery size. The LED light on the charger turns green when charging is complete.
Is it safe to charge my Gotrax scooter overnight?
While Gotrax scooters have overcharge protection, it’s best not to leave them charging unattended for long periods. Unplug once the battery is full to preserve battery life.
What should I do if my Gotrax scooter won’t charge?
First, check the outlet and charger. Make sure the port is clean and the rubber flap is closed. If it still won’t charge, contact Gotrax customer support for assistance.
How do I clean the charging port on my Gotrax scooter?
Use a dry, soft cloth to gently wipe the port and rubber flap. Avoid using water or cleaning chemicals, as they can damage the electrical components.